Today everyone at the University of Hull got their results for semester 1 of this year, including myself.
Semester 1 this year was almost certainly the most challenging semester I have taken so far at university, as you might expect. This increase in difficulty meant I had to put in even more effort and be even more determined than in previous years — therefore I was both pleasantly surprised, and extremely happy with my results — 90% for “Data Mining and Decision Systems” and 83% for “Languages and Their Compilers”.
These grades, combined with my grades from last year, put me in a very good position to get a first class degree, which of course I’m very happy about.
I will of course keep the blog updated over the rest of this final year.
Yesterday I had my last exam of the semester, and handed in my interim report for my final year project. Those two things being done signals the end of the first semester of the third and final year of my Bachelors degree. Exciting times.
This semester has been an interesting blend of very challenging, incredibly interesting and quite good fun — and though there have been a few times when I’ve felt slightly overwhelmed by work I’m glad I took the modules I did and felt I have learnt and achieved a lot!
I will receive the results for both “Languages and Their Compilers” and “Data Mining and Decision Systems” on the 24th of February, I will of course update the blog when I know what grades I have achieved.
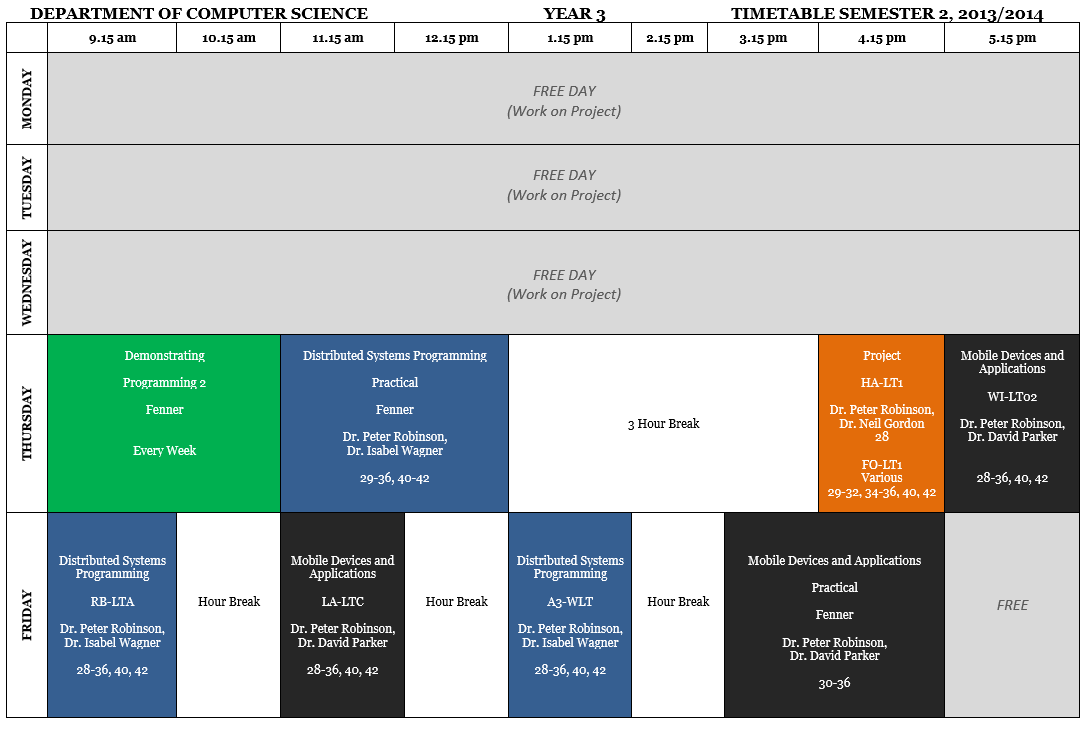
Alongside my project and studies I will also be continuing in my role as an undergraduate demonstrator for the department of computer science. In the forthcoming semester I have been tasked with helping out students on the 1st year module “Programming 2” which teaches object orientation and other concepts in C#.
The two modules I will be taking in semester 2 are “Mobile Devices and Applications” and “Distributed Systems Programming”
Mobile Devices and Applications is the module concerned with developing mobile apps with a good user experience, knowledge of different mobile platforms — such as iOS, Android and Windows Phone — and technologies — such as 3G, 4G and WiFi. I am aiming to do really well in this module as I have already developed quite a fewmobileapps.
Distributed Systems Programming is a module about the “architectures, technologies and programming paradigms used in implementing and deploying distributed computing applications”. A distributed system is “a software system in which components located on networked computers communicate and coordinate their actions by passing messages”. I’m looking forward to this module because I really enjoyed networking in year 2.
I will of course keep the blog updated throughout the upcoming semester. Bring it on!
You may have noticed that my blog hasn’t been updated nearly as much this semester as it has been in those last year and the year before. One of the reasons for this has been the Languages and Compilers assessed coursework, which has taken up quite a bit of time.
The aim of the coursework was to build a compiler, a bit of software which converts from a “high level” human readable language to a “low level” language a computer can execute, for a completely made up language called SPL – which stands for Simple Programming Language.
Formalizing the Grammar of the Language
SPL If Then Else Syntax Diagram
The first thing we had to do was formally specify the grammar of the language — the grammar of a language specifies what is, and isn’t, valid in said language — we did this by reading some syntax diagrams provided to us by our lecturer, such as the one above, and then writing out Backus-Naur form notation to describe it. The image above in Backus-Naur form is notated as:
<if_statement> ::= IF <conditional> THEN <statement_list> ENDIF |
                   IF <conditional> THEN <statement_list> ELSE <statement_list> ENDIF
Items in <brackets> are other rules, so there would be another rule which describes the syntax of “conditional” and “statement list”. Using multiple rules together allows us to build up a complete syntax for the language.
The Tokenizer
Once we had developed a complete BNF grammar for the language we could move on to building the compiler itself, this was especially interesting for me because my final year project uses a lot of the same concepts.
The first stage of building the compiler was building a tokenizer. A tokenizer, as I’ve spoken about before, is a system which recognizes certain keywords, or patterns, and gives them a label which can then be used later on in the compilation. For example the C# code:
public static void main()
{
     int a = 10 / 2;
}
Consists of the following tokens:
Public Keyword
Static Keyword
Void Keywork
Identifier Pattern main
Open Bracket (sometimes referred to as BRA)
Close Bracket (sometimes referred to as KET)
Open Curly Bracket
int keyword
Identifier Pattern a
Symbol =
Integer Pattern
Symbol /
Integer Pattern
Semi Colon
Close Curly Backet
We used an open source version of the Unix program lex, called flex, to build our tokenizer (in my FYP I’m building a tokenizer from scratch). In our flex file we recognized tokens using regular expressions. Matching something like a keyword is rather simple, you just look for that literal string, however looking for an integer is a tad more interesting. Below you can see a few examples:
/* Primitives */
digit                  [0-9]
number                 {digit}+
/* End: Primitives*/

//Public keyword
public                 TOKEN(public);

//Integers (e.g. whole numbers)
{number}               TOKEN(integer);

//Reals (e.g. Numbers with decimal point)
{number}.{number}      TOKEN(float);
On the left hand side of the token recognition is the pattern that has to be matched. For the word public it is the literal string public, for integers it is a {number} and for a real it is a {number} a full stop and then another {number}. {number} has been declared previously to be 1 or more digits, and a digit has been declared before that to be any number between 0 and 9.
The tokenizer takes a .spl file, which contains spl code written by a programmer, and spits out an array of tokens which we can then use in the next stage.
The Syntax Parser
Once we’ve finished building our tokenizer we could then go on to building a syntax parser. The job of the syntax parser is to ensure that the array of tokens provided by the tokenizer are in an order which makes sense. To produce the syntax parser we used a free program called Bison, which is based on the Unix program YACC.
This is where we go back to the Backus-Naur Form we made previously. Using that, with some alteration, we produced a .y file which, once passed through Bison, could identify correct grammars in the list of tokens passed to it — and tell the programmer there was an issue with their code if anything was detected as incorrect.
Correct grammars were added to a parse tree, in hierarchical order. As we saw earlier, an IF statement contains a conditional, so that became one of the branch nodes of the tree which represented an IF statement.
At this point we could print out the parse tree, my software could print both to the console and to an interactive animated viewer. Below you can see both:
a.spl Parse Tree as shown in the Command Prompta.spl Parse Tree as Interactive Animated Viewer (Click to enlarge)
Code Generation
Once we have determined that the input file from the programer is syntactically correct we need to generate executable code. For this coursework instead of generating an executable directly we generated ANSI C code, and passed that to the GNU C Compiler. We did this for a few reasons:
Generating machine code directly wouldn’t be as portable
Generating machine code would take a lot longer!
Learning ANSI C was really useful, as its the number 1 most used programming language in the world
Generating code was a simple case of walking the parse tree and generating code for each node… for example, if you reach an IF THEN ELSE node you could simply output the following:
if(/*Generate code for the CONDITIONAL here*/)
{
    /*Generate code for the IF statement list here*/
}
else
{
    /*Generate code for the ELSE statement list here*/
}
Ensuring you generate code for the conditional and statement lists in the correct sequence. Certain types of grammar throw up a few problems, such as FOR LOOPS (which way should the iteration go?) but the concept of code generation from a tree in itself is simple.
Optimization
The final part of the coursework was to add some optimization to the compiler. Some optimizations you could implement included:
Don’t compile the code if it doesn’t contain and input or output (if a program has no input or output, it looks the same as having no program at all!)
If a programmer increments a variable by 1 generate the ++ operator rather than +1
Constant Folding: If a variable is assigned to the outcome of a constant set of values. e.g. a = 4/2, then generate a = 2 because this will always be the case
I chose to do both the incrementation optimization and the no input or output optimizations. I was going to add constant folding too, but didn’t think I had enough time.
Conclusion
Today I got my grade for the coursework and achieved 80%, which is a strong first class. I’m really happy with this. 🙂
I would recommend that any second year thinking about what modules he or she should take next year seriously consider Languages and Compilers, it is by far the best module I have taken. It combines knowledge from all your previous modules and really cements that information in your head.
I’d like to thank both Dr. Martin Walker and Eur Ing Brian Tompsett for setting such an interesting coursework, and providing me with the help that they did along the way.
If I’m allowed I might upload my compiler and some documentation for SPL for people to have a play with it.
Today my third year project allocation was finalized, and so I am very excited to start talking about it.
A third year project, sometimes known as a final year project (though not by me because I’m on a four year Masters course), is a software development and documentation project spanning from now until the end of the third year. In that time we have to write about how we plan to make a piece of software, make said piece of software and then review how we did, what we created and how we would do things differently if we had our time over.
It is intended to be an exercise in real development for us all, rather than a piece of coursework that lasts only a few short weeks it will last a whole year, have real deadlines and been completely our own idea and run under our own steam. This means we set out own timetable for when work is expected to be completed by and us and us alone make sure said work gets done.
My personal aim with this project is to produce the piece of software that I am most proud of. A hope would be to have something that I could either sell commercially, or release as an open source product that would develop an active community.
So, onto the project I’ve been allocated. Below you can see the project description, originally written by Dr. Martin Walker
Code editor with syntax highlighting & autocomplete
Although it is possible to program using nothing more than Notepad and a compiler, it is much easier to use an Interactive Development Environment (IDE) as the GUI for programming. Typical features include syntax highlighting, so that the keywords are readily visible, and autocomplete (e.g. like Visual Studio’s Intellisense) to improve efficiency or gain context dependent help.
This project would involve creating your own IDE, such as a simple Notepad++ style program (http://notepad-plus-plus.org). Primary features would include syntax highlighting and autocomplete, but other possibilities include compiler integration (to run the compiler from within your IDE) and feedback on errors, e.g. highlighting lines with errors in red. You could choose to make the IDE specific to a single programming language, or configurable so that it can be used with multiple languages.
My plan to work within this frame, but also add to it, is to create an IDE for the server side programming language PHP – The Hyperscript Pre-processor. This is the programming language I first learnt, and therefore one of the languages — alongside C# — that I am most comfortable with. This means that hopefully, with my years of experience with the language, I will know what developers want in their IDE and be able to implement it in a good way, in fact I already have a few good ideas.
I do know, from years of doing PHP that there isn’t an IDE that makes developers as comfortable as say Visual Studio does for C# or C++ developers. I hope to change this.
One of the other interesting things about this project is that it will go really well with one of the modules I’ve chosen for next year, which is titled “Languages and Their Compilers”.
Expect to hear a lot more about this in the future!


")
